Tuesday, May 3, 2016

ISP Presentation

For my ISP presentation, I wanted to start off by splitting the class into three or four teams and having them try to figure out their way through the human knot (to simulate the struggle of untangling yarn).

I plan on crocheting a bunch of small prizes and giving each member of the winning team a prize. 

I also want to lay out a bunch of pieces of yarn and try to teach everyone how to finger crochet (since teaching how to crochet with a hook takes a lot of time, individual attention, and crochet hooks).

I would like to bring some kind of food as well, but haven't yet thought of anything that connects well with crochet. I could possibly bring cookies shaped like crochet hooks (basically candy canes) or make a cake that somehow connects. My presentation is May 25th, however, so I still have some time to work out the details.

Dumpling Kitty

The newest addition to my crochet repertoire is the Dumpling Kitty, pattern designed by Sarah Sloyer and posted onto her Ravelry (an online website for crochet patterns) store.

When I first glanced over the pattern, I had assumed it would be fairly easy to quickly crochet. However, things got rough within ten minutes. The pattern actually was a little more complicated than I expected, and called for the chaining of the two ears together to form a unified row:

I messed up at one point and lost a few stitches, so my stitch count was off for the rest of the piece. 


I kind of just ignored the fact that my stitch count did not correspond exactly with that of the pattern, and just improvised when I needed too.

The next problem came from all the color changing due to the striped pattern. I learned it wasn't the best idea to not cut each strand of yarn after each color change, no matter how lazy I was feeling. Leaving the strands of yarn attached to each piece resulted in kind of a bridge-like structure on the inside of the piece:

Once I stuffed the cat, however, I was able to hide a lot of the imperfections. I embroidered on a nose and smile and attached the front paws and tail at the end.


Totoro Amigurumi

Today I decided to take on the task of crocheting one of the most beloved animated characters of all time: My Neighbor Totoro. I used this pattern designed by the crochet blog 53stitches.

The pattern was fairly straightforward, though it did use up a lot of yarn. Crocheting this Totoro consisted of stitching together seven different parts: two ears, two arms, one tail, the stomach, and the main body.


One unusual thing about this pattern, however, was the call for a border around the eyes. I ended up punching a hole through two pieces of white felt and pushing the safety eyes through the holes.


Before I post this as a listing on my Etsy page, I plan to embroider some details, such as a nose, whiskers, and the chevron pattern on Totoro's stomach. Generally, well-known characters such as this one sell well on Etsy, so I'm excited to add this one to my shop.

Wednesday, April 6, 2016

Westwood Thirst Project

The Knitting Club was recently contacted by Westwood's NHS to help out with a Thirst Project awareness campaign. They asked us to crochet a water droplet for them to hide around the school for a project raising publicity about Warrior Fest and the Thirst Project. Somehow, I ended up being volunteered to crochet the water droplet. I couldn't find any good patterns, however, so I based my droplet off of this pattern:

Since the original pattern is only two to three inches tall, I had to modify it a little. I added about five or six rows, which caused it to increase in both height and width, and my resulting water droplet looks like this: 
My water droplet is rougly half a foot tall, which still seemed a little on the small side, but the NHS officers seemed to accept it, so hopefully they won't ask me to redo it. I'm not completely sure what this publicity project is, but I'm happy to have made my contribution.

Wednesday, March 30, 2016

Warrior Fest

Knitting Club is running a booth for Warrior Fest for the second year. This year, we plan on hosting a draw-of-luck game where each ticket could potentially win a prize, and all money will be donated to the Thirst Project. Since Warrior Fest is very soon, we are working on quickly making an array of crocheted stuffed animal prizes to hand out at the event. Ones we are planning on giving away include:


Plus others depending on the time and resources we have. We are planning on making mostly smaller prizes with a few larger ones, and each can potentially be won by an (arguably small) probability. Hopefully this will encourage more ticket sales however, and thus provide more donations for the Thirst Project overall. 

Revamping the Shop

Most of my Etsy listings expire soon, so I'm focusing today on fixing up my shop and re-organizing products and policies and layout. I renewed my Etsy listings for my top hat, miniature Baymax, and donut, as well as added a new product based on this pattern:
   

I also updated my shop policies to reflect Etsy's new change in shipping policy and terms. I adjusted my rates accordingly and double checked to make sure they adhered to Etsy's new terms (which included notifications about the USPS's recent increase in retail rates).

Lastly, I've been working on a banner for my shop, but I discovered my lack of talent with photo-editing and graphic design. I downloaded a program for image editing and am currently working on figuring out how to add layers and different effects, but I will try to get a banner up by this weekend.

Pony Pattern

One of the most popular patterns circulating Pinterest is for this horse, developed by the blog All About Ami:

I have been a little intimidated by this pattern since I first saw it, especially because it involves many asymmetrical increases and decreases, as well as a five-part mane. However, I finally decided to give it a try and documented the process as I went.

At first, I was a little worried because the head seemed much larger than the body. Looking back over the pattern, I couldn't figure out what I might have done wrong, so I just left it and hoped that, when put together, it would look right.
The next part I crocheted was the mane, which consisted of five pieces sewn together: 
Then I sewed these pieces, along with the ears, together to create the body-portion of the horse: 


Lastly, all I need are the limbs and tail of the pony, and will upload the finished result onto my Etsy when completed. 

Tuesday, February 9, 2016

Valentine's Whale

I've been working on crocheting a bunch of the Knitting Club products. We have had quite a few orders so far, and so we are all trying to pull our resources together and get the orders out before Friday. We're aiming to raise enough money to sponsor an alpaca (the semi-official Knitting Club mascot) throught the Heifer Project.

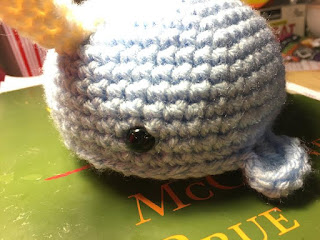
Many of the patterns we included on our list are not quite "Valentine's" themed alone, so we have taken to sewing little hearts on the sides of the stuffed animals. One of the animals I have recently finished is this narwhal:


I am considering selling this one on my Etsy account as well, and will likely add the listing as soon as I can take some better product pictures.


Displaying image1.JPG

Knitting Club Fundraiser

Knitting Club is working on a project this year to sell crochet stuffed animals and raise money for the Heifer Project, which donates an animal to a community in need. We have been organizing this for a while, and are planning to start selling this week. Since it's so close to Valentine's Day, we decided to have a theme for our products, and so recently I have been collecting free, available patterns that we can easily make and sell in a timely manner.

Here are the products we are planning on selling/creating custom orders for:
Small bird


Penguins

Rose

Valentines Puppy
crochet narwhal pattern-4 copy.jpg
Nelson the Narwhal

For the next week or so, I think I'll focus mostly on fulfilling orders and working on our product inventory. (If anybody reading this knows anyone who might want to order, let us know, and we can send them the full list of products and pricing!) 

Designing Caravan Furniture


I have decided to turn some of my attention back to my caravan, but this time I am going to be focusing more on the interior furniture and putting everything together. I'm using this picture as a model for my designs, though I'm not yet sure how much I plan to deviate from the original design:
What I am aiming to achieve

Since I am trying to write my own patterns, I thought I would give it a try with something simple, such as the countertop/sink and the overhead cupboard. Here is my first attempt:

Countertop Pattern:
Sl st: slip stitch
SC: single crochet
Ch: chain
BLO: in back loops only

Row 1: ch 7, sl st into second stitch from hook, turn
Row 2: SC in every stitch, turn
Row 3-8: SC in every stitch, turn at ends
Row 9: BLO: SC in each stitch, turn
Row 10-19: SC in each stitch, turn
Row 20: BLO: SC in each stitch, turn
Row 21-26: SC in each stitch
Row 27: BLO: SC in each stitch
Row 28-37: SC in each stich, sl st to starting end

The pattern for the sink may be a little trickier, however, Since there is a dip where the base of the sink should be, I probably will need to make the top of the counter in multiple pieces, then crochet the pieces of the counted together and sew the sink into the gap. I will test out various possibilities and post the pattern for the best one once I decide what to do. Other than that, the rest of the furniture should not be as tricky, and I will be assembling the entire caravan soon.